

Our Learning Center
The 2024 Guide to Skylight Installation
Skylights are a popular way to bring more natural light into a home. If installed correctly, skylights can transform dark, windowless spaces with sunlight and give you beautiful views of the sky. This guide will cover the key factors to weigh when considering skylights, what to expect during the installation process, tips for proper maintenance and more.
What Are the Benefits of Skylights?
There are several advantages high-quality skylights can offer a home:
Natural Lighting - Skylights flood rooms with natural light, reducing the need for artificial lighting during the daytime. This can help create a brighter, more open feel.
Energy Efficiency - Properly-installed skylights with insulated glass allow light in while preventing heat loss and gain. This can help reduce energy costs.
Ventilation - Some skylights have venting options to circulate fresh air. This aids healthy air quality.
Aesthetic Appeal - Skylights instantly add architectural interest. They can complement many design styles with customizable shapes, sizes and window styles.
Expanded Space - Skylights open up small, windowless spaces and make them feel larger. Rooms seem less confined with overhead light streaming in.
View of the Sky - Skylights provide attractive views of the sky, trees, weather and other sights from above. This connects the indoors with nature.
Increased Property Value - Quality skylights boost curb appeal and can increase a home’s value. Natural light and vaulted spaces are desirable features home buyers look for.
Where Should Skylights Be Installed?
Skylights work best in rooms and spaces that lack sufficient windows, have high ceilings, or could benefit from ventilation. Ideal placement areas include:
Living Rooms/Family Rooms - Great for bringing in natural light and a view. Avoid placing near a television or glare will be an issue.
Kitchens - Allows sunlight in for food prep and creates a pleasant dining space. Avoid above the sink or stove.
Bathrooms - Makes small bathrooms feel more open without compromising privacy. Avoid above showers.
Staircases - Lights up stairs for safety and illuminates two-story foyers beautifully.
Hallways/Foyers - Provides overhead lighting to reduce gloominess and brighten traffic flow areas.
Attics - Turns unfinished attic space into livable rooms by adding much-needed light.
Basements - Skylights with window wells can make below-grade rooms feel less subterranean.

Skylight Types
There are several varieties of skylights to suit different installation needs:
Fixed Skylights - Non-opening panels made of glass, acrylic or polycarbonate. Provide the most light.
Venting Skylights - Allow fresh air circulation. Manually operated versions tilt open while motorized ones automatically open at certain temperatures.
Tubular Skylights - Channel daylight through tubes/shafts from roof to interior dome diffuser. Great for small, interior rooms.
Glass Skylights - Glass tops offer maximum light transmission but come at a premium cost. Tempered glass types withstand impact best.
Plastic Skylights - Made of acrylic or polycarbonate plastic for budget friendliness and good durability. Can discolor and scratch over time.
Flat Skylights - Sit flush with the roof for simple installation and a discreet look. Don’t allow as much overhead light through.
Bubble Skylights - Protrude from the roofline with domed shapes for architectural interest. Allow ample light but can leak if poorly installed.
Skylight Materials
Skylights consist of a frame, glazing and flashing materials:
Frame – Usually vinyl, wood or aluminum. Vinyl withstands moisture but can warp. Wood needs repainting. Aluminum is lightweight but conducts heat/cold.
Glazing – Glass, acrylic or polycarbonate. Glass offers maximum light transmittance but costs more. Plastics scratch easier but are more affordable.
Flashing – Seals off openings and directs water runoff. Copper and galvanized steel are common flashing materials that handle water well.
Other components like weatherstripping, adhesives, sealants and insulation improve skylight energy-efficiency and durability.
New Innovations
Recent skylight innovations enhance functionality and convenience:
Electrochromic Glass - Changes tint electronically to filter excess light/glare. Operates via smartphone app control.
BIPV (Building Integrated Photovoltaics) – Functions as a solar panel to generate onsite electricity. Provides both roofing and energy production.
‘Smart’ Skylights – Use sensors to automatically adjust transparency, ventilation and more based on conditions like temperature, humidity, time of day, etc.
Light Diffusing Technology – Acrylic prismatic lenses and other materials help diffuse sunlight for softer, glare-free distribution indoors.
Nanogel Insulation – Advanced thermal insulation with nanotechnology keeps interior heat stable and reduces condensation.
Skylight Costs
On average, expect to pay $600 - $2,500 for the total skylight installation, not including roofer labor charges. Here are typical price ranges:
Basic Plastic Skylight - $120 to $320 for just the unit.
Tempered Glass Skylight - $300 to $800+ for just the unit.
Flat Skylight - $150 to $500+ depending on size and features.
Tubular Skylight - $200 to $1,000+ depending on tunnel length.
Installation – Usually around $200-$500 per skylight, depending on complexity.
Electric Venting Feature – Adds $100 to $300+ to installation cost.
Bigger, customized or energy-efficient skylights with automation and premium glazing will fall at the higher end of the scale. Get multiple quotes to find the best rate in your area.
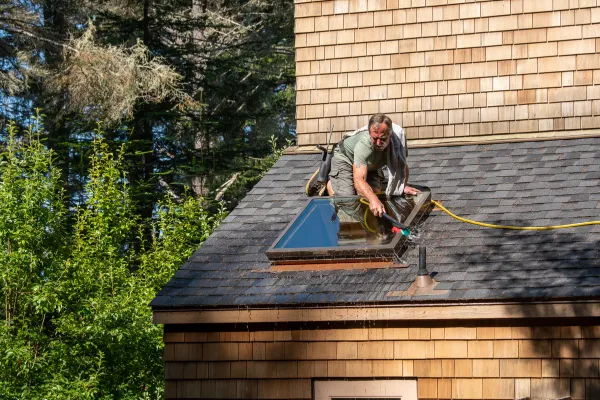
DIY vs. Hiring a Professional
Installing skylights involves roof alterations, which makes hiring a licensed, insured roofer advisable for several reasons:
Rooftop safety – Working on roofs can be dangerous without proper setups and equipment. Professionals have the training and gear to access roofs safely.
Tricky installation – Cutting openings precisely, integrating flashings and making sure skylights are watertight requires know-how DIYers lack. Even small mistakes can lead to leaks or other issues down the road.
Manufacturer warranties – Most skylight brands require certified professional installation to keep their product warranties valid.
Skylight service life – Improper installation often shortens how long skylights last and function properly. The initial cost savings of DIY typically doesn’t outweigh redoing the job sooner.
For the highest quality and longest-lasting results, it's worth investing in a professional roofing company's skylight expertise.
How Are Skylights Installed?
The skylight installation process involves:
Inspection – The roof is checked to ensure it can structurally support skylights and identify potential issues.
Mounting point – Placement is mapped based on room alignment to optimize light exposure and effect.
Roof opening – A section is precisely cut and removed according to the unit size. This is one of the trickiest steps.
Flashing installation – Self-adhesive waterproof flashing material is set around the opening to create a water-tight seal.
Mounting the skylight – The unit frame is thoroughly secured into the roof opening using sturdy fasteners, sealant and roofing adhesives.
Waterproof testing – The skylight is checked for leaks from spraying water over it and examining joints. Adjustments are made if needed.
Sealing and finishing – Exterior sealants are applied for maximum water protection. The roof shingles are resealed around the skylight edges.
Interior trim – Drywall, plaster or wood trim finishes the ceiling opening for a streamlined look and hides seams.
The process for flat or tubular skylights differs slightly but still requires roof expertise. Most installations take 1-3 days depending on the number of skylights and complexity involved.
How to Make Your Skylights More Energy Efficient
To reduce heat loss and gain through the skylights, consider these tips:
Purchase double or triple pane glass skylights or plastic skylights with advanced insulating air pockets. Look for an R-value of at least 4.
Choose thermally broken skylight frames without metal-to-metal contact to minimize conduction. Vinyl, composite or fiberglass frames have the best thermal resistance.
Install a model with Low-E (low-emissivity) glazing coatings for improved insulation. Low-E also protects interior furnishings from UV damage.
Use remote control shades, drapes or blinds to block excess light/glare and regulate sunlight heating. Automated versions provide the most convenience.
Opt for special aerogel or thermogel skylight insulation which minimizes heat flow much better than air or fiberglass insulation alone.
Have flashing and weatherstripping properly installed around the full skylight opening for minimal air leakage. A tight seal is key.
Select an Energy Star rated model certified to meet strict energy performance standards and save on cooling and heating costs.
Skylight Maintenance Tips
While skylights are built to last, proper maintenance optimizes their longevity:
Clean the interior and exterior glass 2-4 times a year using soft cloths and mild, non-abrasive cleaners to prevent dirt and grime buildup.
Inspect sealants and flashings around the exterior frame every fall. Reseal any deteriorated areas to prevent leaks.
Check for condensation or fogginess between interior glass panes which indicates the insulated glazing seal is broken and needs glass unit replacement.
Lubricate any hinges on venting skylight operators annually so they open smoothly.
Clear all debris from skylight surfaces and surrounding roof areas to encourage proper drainage and prevent blockage.
Reglaze cracked or broken skylight glazing immediately to avoid serious leaks and related damage.
Repaint any exposed wooden skylight frames as needed to refresh protection against moisture and rotting.
Have a roofer inspect entire skylight flashing and sealing every 5 years or so to catch any developing installation flaws early.
Skylights are an investment that pays dividends for many years when properly installed and cared for over time. By following the recommendations in this guide, your new skylights should provide your home with abundant natural light, beauty, ventilation and energy savings for decades before needing replacement. Reach out to our team of skylight installation experts if you have any other questions!


How can we help you today?
Our family is standing by to help yours.


Resources
Contact
3440 Blue Springs Rd. NW
Suite #202
Kennesaw, GA 30144
1720 Mars Hill Rd.
Suite 8-282
Acworth, GA 30101